Showing posts with label crafts. Show all posts

Wednesday, September 11, 2013

Bicycle Art

It seems like ages ago I told you that I would have a fun little art project for S.R.'s room. Well, I finally got around to making one.
I just needed the right inspiration!
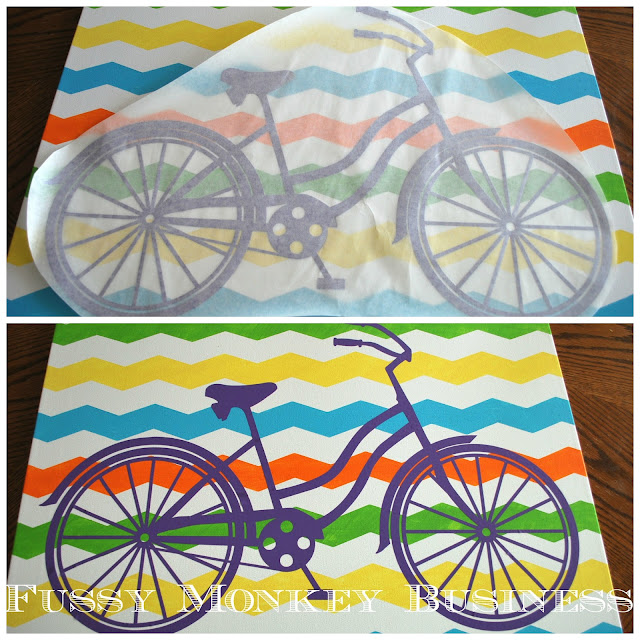
I wanted to do something with a bike, but just wasn't sure what. I came across this really cute vinyl cruiser on Etsy , and knew it was exactly what I needed.


And this is what I came up with.
FrogTape makes a chevron painter's tape. Crazy! I know!
 It's super easy to use! 

I found some at Lowes the other day, but you can also purchase it from Amazon. 
Click the link below and it will take you directly to Amazon.

                               
The tape isn't recommended for use on textured surfaces...says so right on the box. As you can see below, my canvas is a textured surface. I went with it anyway because sometimes you can bend the rules a bit in the crafting world. 
I used a scrap piece of tape to keep my lines even.
Once all of the tape was down on my canvas board, I smoothed out all of the edges, painted, and promptly removed the tape.
After letting the paint dry for about 30 minutes, I placed the vinyl bike on top of the painting.
You have to be patient with vinyl. It can tear easily, and can stick together if you don't follow the instructions.
Once in place, I smoothed it out to make sure there weren't any bubbles.
I had the large frame on hand. I was actually using the frame as a Christmas card holder. However, last year, the cards never made it to the frame. 
So I figured I would make good use out of it, paint it purple, and hang it in S.R.'s room.
I don't normally do anything with colors this bright or go with things that are this contemporary because it's not my style. I'm more of a classic style kind of girl.
However, it is S.R.'s style...so I'm goin' with it;o)


***************************************************
Disclosure: This post contains Amazon affiliate links. By clicking on said links, you help me make money. It wouldn't hurt my feelings a bit if you decided to click and buy;o)


Photobucket

Craft Dictator

Wednesday, August 7, 2013

Craft Room Makeover

I have been meaning to share my craft room. I finished it a looong time ago, but I never got around to taking pictures of it and posting about it.
I have barely set foot in here, other than working on a few things for S.R.'s Room at the beginning of the summer. Once the kids go back to school, I will have more time to work in here.

So, let me give you the tour of this walk-in-closet-turned-craft-room.
There isn't a lot of space, but it's perfect for what I am doing. 
The antique sewing machine belonged to an aunt or cousin of my mother's many moons ago...not exactly sure what her connection was. 
When I was a little girl, I used this sewing machine table as a desk to do my home work on. I can't tell you home many hours I popped that pedal up and down while working away on homework.
 The way I had the room set up before made it very difficult to stay organized. To see a before, you can go here.
I ripped out two wire shelves(FYI-they leave ENORMOUS holes in the wall), and gave the walls a fresh coat of paint.
I did a major cleansing of the craft room as well, and donated an entire van load of crafty goodness. 
Now that the clutter is gone, everything has a place, and there's some room to grow.
I needed an "idea board", and loved the look of a crib spring. It's been all over Pinterest, and I had one. Trendy and free...can't beat that!
  My main storage piece has to be my most favorite thing in the room. I had these cube shelving units, but they always ended up looking messy and disorganized. I looked online for storage bins, but they ranged from $6-$12. I needed 18 storage bins...that's a lot of money! So, I went to Target, and low and behold in the dollar section they had storage bins($3 each). I wanted all the same color, but when you're rummaging through the dollar section, one cannot be overly picky.
I found inspiration from the Land of Nod
&
With 2" wide painter's tape, number stencils, and some white fabric paint, I was able to get a similar look.
All of this for less than $60 versus $108-$216 before taxes and shipping. Not too shabby, eh?
 Another favorite in the room is the diy chalkboard. 
It is an access point into the attic, but with a little chalkboard paint, now it's actually a useful piece...I mean it was useful before..if you needed to get to the backside of the attic..but it's even more useful now, since we'll probably NEVER bust through it to get to that part of the attic:o)
I'm totally digging this new space, and it's so much easier to create in an organized environment...well it will be once I have a few minutes to myself;o)
 What are some ways that you have organized your craft space? I would love to hear!!

Wednesday, April 17, 2013

Engagement Party

This past weekend, I had the honor of helping put together an engagement party for a very sweet friend's nephew. It wasn't supposed to be at her house originally, so when I got the call, we had to put all crafty gears into over drive.
I had her email me a few pictures of things she wanted to see at the party and ran with it.
I'll provide some of the details, but I'm going to let the pictures do most of the talking.
This little sign was at the base of the stairs as you walked up to the front porch. It's made of balsa wood. The sign was stained and hand painted with their names and the date of their wedding.

 In the front entrance, there was an heirloom Bible for guests to sign or highlight their favorite verse along with photos of the bride and groom when they were children.
The gift table
Aren't the flower arrangements beautiful? I love hydrangeas and blue mason jars...you can never go wrong with either of those:o)
There was additional seating outside.

 Here are the center pieces for the tables. Battery operated votives and tea lights were life savers for this outdoor affair.
This was the drink station. I thought it was pretty lucky that we share the same last initial...The mother of the groom made the little flags for the paper straws. I wish I had taken a closer shot of them. They were adorable. 

I had a lot of helpers in putting this together, and it wouldn't have happened without all of their help. 
I was so grateful to be apart of making this sweet little couple feel extra special and I wish them great joy and happiness in the years ahead! 


Wednesday, March 6, 2013

Basketball Picture Frame

This year the hubs and I coached E's Upward Basketball team. It was filled with lots of surprises, and it was a lot of hard work, but all 5 boys seemed to have a great time playing.
We had the awards night this week, and I wanted to give them something special. I'm not a fan of trophies, and at this age, the trophies usually are broken to bits within the first few days of receiving them.
After our very last game, I got a candid shot of the boys. 
I decided that I would make picture frames for the boys as their gift.

I found all of the items at Hobby Lobby.
-Picture Frame
-Purple Spray Paint
-Wooden Basketball Cut-out
-Hot Glue Gun(had on hand)


I laid the frames(minus the glass and backing) on a cardboard box outside where there was plenty of ventilation.
 

I sprayed 3 coats of purple Krylon paint on the frames..waiting 10 minutes between each coat.


Once they were dry, I glued the little basketball guy to the corner of the frame making sure not to let it hang too low across the bottom. 
Now they will have something to look back on and smile about...it's not a faceless trophy, but a keepsake to help them remember the friendships that they developed in their very first basketball season.


Saturday, December 22, 2012

18" Doll Bed, Quilt, Pillow and a Mattress Tutorial

Are you guys ready for Christmas yet? Do you have all of your gifts bought, wrapped and tucked neatly under the tree? We are done for the most part. I think I am going to make one more thing for E and then we will be done. 
Today's post is about what we(the hubs and I) made for S.R.
She has asked for an American Girl Doll for Christmas this year. She is 4 years old...she ain't gettin' an American Girl Doll. However, she is getting a "Famerican" Girl Doll...(Faux-American). Ole Santy Claus is bringing her the doll from Target that looks just like the real deal, and it's 1/3 the cost.
So, I came across a really cool building plan for a doll bed on Ana White's Blog. It is perfect!
I knew the hubs could make it, and so he did:o) 
I decided that I needed to make some really cute bedding to go along with it. 
This Famerican Girl will be resting in style:o)
(I got a little impatient, and decided to take pictures before the hubs could get it stained..pics of the final product will come after X-mas)
This is my very first quilt to actually quilt myself. I found an easy tutorial at Mommy by day, Crafter by night. I was able to make this little quilt in about an hour and a half. The fabrics were from a fat quarter bundle purchased from the Hob.
 The pillow was an absolute must as well:o)
 Here is the under-side of the quilt.
When I laid the quilt and pillow across the bed, the quilt wouldn't lay right. The spindles were in the way, and it just looked like it needed an extra something, so that's when I realized this bed needed a mattress.
This is sort of a tutorial, but not really a step-by-step because I was in a rush to get this done before S.R. got home from school yesterday:o)
I started with two fabrics, you could use the same fabric, but this was leftovers from the fat quarter pack, so I used what I had.
I stitched them together to form what looked like a pillow. I realized I didn't have enough to cover the base of the bed, so I had to add a strip across the top to lengthen it. Once it was re-stitched, I laid it across the bottom of the bed to make sure it fit.
I then stuffed it with poly-fil, and closed the end up by hand-stitching. I usually avoid any hand-stitching at all cost because I am too impatient. However, I really wanted this to look nice, so I bit the bullet, and used my little needle and thread. 
To prevent the mattress from looking like a big pillow shoved into the bed, I tufted it. I had a fabric button covering kit(is that what they're called??), and I used the purple polka dot fabric to cover the buttons. This task was a little more labor intensive. I used a long needle, and lots of patience. At one point, I really thought I was going to need a Band-Aid as well...OUCH! 
This is the back-side of the mattress. Yes, I realize that there are two sets of buttons...why, you ask? Because this was a last minute project, and I didn't have time to go buy matching buttons:o) And, yes, it's staying that way.
So it's complete, and I am thrilled with the results. 
 Perfect for her Famerican Girl Doll!!
Participating in these parties:
Classy Clutter

Wednesday, December 5, 2012

D.S.C.C.W.-Waterless Snow Globe

Last week I ran across a really cute Dollar Store craft over at the CSI project.
They were waterless snow globes. This particular craft is what got the wheels turning for this week's projects.
 Our snow globes look slightly different than the ones from CSI. So far, these are the kids' favorite Christmas craft:o)
The base for their snow globes are the same from the Snowman Ornament. They are found at the Hob.
I let them paint their bases any color they chose...I was definitely surprised by S.R.'s choice, but I think it's because she knows it's mommy's favorite color:o)
They both got to pour the sugar into the bowls. I used 1/4 c of sugar in each.
I handled the hot gluing. As you can see there was a tad bit of over kill on the hot glue:o)
So I added the ribbon around the the gunky glue area to clean it up. Super cute, super cheap, and super fun!!
In case you missed it, and would like to see what else we have been up to this week, click on the links below!!